Accessory Dwelling Units have become a popular housing option across Massachusetts. While recent regulations have made ADU construction more accessible, the process is still far from simple. From planning and approvals to design and building requirements, there are many factors to consider before starting a project. This guide explains ADU construction in Boston step by step, helping homeowners understand what to expect throughout the process. Whether your goal is to create housing for family members or generate rental income, understanding the basics can help you make smart decisions and increase your property’s value.
Understanding ADUs in Residential Construction
An Accessory Dwelling Unit, commonly called an ADU, is a smaller independent residence located on the same property as a primary home. Although it shares the same lot, it functions as a separate living space with its own kitchen, bathroom, entrance, and utility services. ADU construction generally falls into three categories: detached, attached, and internal units.
A detached ADU is a separate structure built away from the main house, providing greater privacy and flexibility. An attached ADU shares a wall with the existing home while still operating as an independent living area. An internal ADU is created within the current structure by converting existing spaces such as a basement, attic, or underused rooms into a self-contained residence. This option often costs less but offers fewer design possibilities.
What Makes ADU Construction Unique?
ADU construction differs from traditional residential building in several important ways. One major factor is the combination of state regulations and local zoning requirements. Since Massachusetts introduced updated ADU laws recently, many municipalities are still adapting their local policies. As a result, approval procedures and development requirements can vary from one town to another. Working with experienced ADU builders can help simplify this process.
Another difference is that ADU construction typically takes place on already developed properties. Unlike new homes built on vacant land, ADUs must fit within existing spaces, connect to current utility systems, and blend with the primary residence. This often creates additional planning and design challenges.
Cost is another area where ADU construction differs. Many homeowners are surprised to learn that ADUs often have a higher cost per square foot than larger residential projects. Essential expenses such as permits, design documents, foundation work, utility connections, kitchens, and bathrooms are required regardless of whether the structure is small or large. Because these fixed costs are spread across fewer square feet, the overall cost per square foot is usually higher.
Are You Allowed to Build an ADU?
One of the most common questions homeowners ask is whether they qualify for ADU construction. In Massachusetts, properties located in zoning districts that allow single-family residences are generally eligible under the Affordable Homes Act. This applies to many single-family and multifamily properties, provided local zoning regulations permit single-family housing in that area. As a result, a large number of homeowners may qualify to build an ADU.
Boston follows its own zoning system, which means state ADU regulations do not automatically apply. Homeowners can still pursue ADU construction in Boston, but the approval process may involve additional reviews depending on whether the unit is detached, attached, or internal. This can increase the time required to obtain approvals before construction begins.
Benefits of Building an ADU
One of the greatest advantages of ADUs is their versatility. Homeowners often build them to accommodate aging parents, adult children, or extended family members. Later, the same space can be used as a rental property, guest suite, or private residence. Here are some of the key reasons homeowners choose ADU construction:
Housing for Family: ADUs provide comfortable living space for parents, relatives, adult children, or long-term guests. They offer a practical and affordable alternative to purchasing another home nearby.
Rental Income: Renting out an ADU can create an additional source of income that helps cover mortgage payments, property expenses, and other household costs while making use of land you already own.
Increased Property Value: As ADU construction becomes more common throughout Boston and Massachusetts, properties with additional living space continue to attract buyer interest and often see increased market value.
Downsizing Opportunities: Some homeowners choose to move into their ADU and rent out the primary residence, creating a more affordable and flexible living arrangement.
Supporting Housing Demand: ADUs contribute to the local housing supply by creating additional living units within existing neighborhoods, helping address housing shortages across Massachusetts.
ADU Rules and Eligibility in Massachusetts
Massachusetts homeowners can now build an ADU under the Affordable Homes Act introduced in 2025. If your property already contains a home and is located in an area where single-family housing is allowed, you may qualify for ADU construction. While the state has created general guidelines, some requirements such as setbacks and site restrictions are still controlled by local municipalities. Because of this, homeowners should always confirm local regulations with their town building department before starting a project.
Boston follows a separate zoning system, which means state ADU regulations do not automatically apply. Many property owners are unaware of this difference until they begin the planning process. Although ADU construction is still allowed in Boston, approvals can be more detailed and may take longer than in surrounding communities. At the same time, Boston ADUs can offer additional benefits, including legal housing opportunities and future property flexibility.
Common Types of ADU Construction
Homeowners generally have three choices when planning ADU construction: manufactured, modular, and stick-built structures. Manufactured homes are built under federal HUD standards and do not meet Massachusetts requirements for an ADU. Modular ADUs are constructed in sections at an off-site facility before being delivered and assembled on the property. Since they meet local building codes, they can be a suitable option for many projects.
Stick-built ADU construction is completed entirely on-site using traditional building methods. This approach offers the greatest flexibility in layout, design, and customization, making it especially useful for smaller or more complex lots. Because of these advantages, many homeowners choose stick-built construction when creating a custom ADU.
ADU Construction Process Step by Step
Building an ADU involves several stages, from early planning to final inspection. Understanding each phase helps homeowners prepare for the project and avoid unnecessary delays.
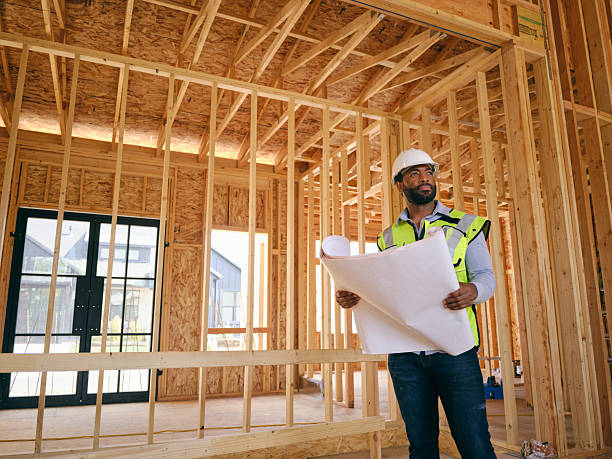
1. Planning and Design Evaluation
The first stage of ADU construction is determining whether the project is possible and financially realistic. A feasibility review examines important details such as lot conditions, utility access, setbacks, site access, grading, and any restrictions that could affect construction. Identifying these factors early helps create a realistic budget and project timeline.
Once feasibility has been confirmed, the design process begins. Homeowners can choose from existing layouts or create a custom design that fits their needs and available space. Whether the goal is additional living space, a home office, storage area, or guest accommodations, the design can be tailored accordingly.
This stage is also the best time to arrange financing. If you plan to use a loan, HELOC, or another funding option, obtaining approval before moving forward with construction documents can help prevent delays later in the process.
2. Plans and Permit Approval
After the design is finalized, detailed construction documents must be prepared. These plans provide the information required for permit approval and construction. Most Massachusetts municipalities require floor plans, exterior elevations, structural drawings, site plans, and energy-efficiency reports before issuing a permit.
All documents must be prepared and approved by licensed professionals to ensure compliance with local building codes. Once completed, they are submitted to the building department for review. Town officials may request revisions or additional information before granting approval.
While permits are being processed, homeowners typically select finishes, fixtures, and materials. Ordering these items early helps keep the ADU construction schedule moving smoothly once work begins.
3. Preparing the Property
After permit approval, the property is prepared for construction. The project manager performs a site review to identify any conditions that may affect the build. This may include locating utility routes, removing vegetation, or identifying obstacles that need to be addressed before excavation begins.
The ADU footprint is then marked on the property, and temporary job site facilities are delivered. Proper preparation helps ensure construction starts efficiently and safely.
4. Excavation and Utility Installation
This stage marks the beginning of physical ADU construction. Crews clear the work area, level the site, and prepare the ground for building. Existing patios, driveways, or landscaping features may be removed if they interfere with construction. Properties with significant slopes may also require retaining walls or additional grading work.
Utility trenches are then installed to connect the ADU to water, sewer, and electrical systems. Depending on the property layout, connections may run through the existing home or directly to municipal services. Proper utility planning is essential for creating a fully functional living space.
5. Foundation Construction
Most ADU construction projects use either a slab foundation or a crawl space foundation. Both rely on properly installed footings placed below the local frost depth to prevent movement caused by freezing temperatures.
A slab foundation places the living space directly on a concrete surface and is generally the more affordable option. However, plumbing must be installed before the concrete is poured.
A crawl space foundation creates accessible space beneath the structure, allowing easier maintenance of plumbing and utility systems. It may also provide limited storage depending on the design.
6. Structural Framing
Framing is where the ADU begins to take shape. Construction starts with the floor system when a crawl space foundation is used. Exterior walls are then built, including openings for doors and windows.
The roof framing follows, along with structural sheathing installed on both the walls and roof. Interior walls are added afterward, creating the layout of rooms and defining the overall living space.
7. Exterior Protection and Finishes
The next objective is making the ADU weather resistant. Roofing materials are installed first to protect the structure from rain and snow.
Windows and exterior doors are added next, followed by siding selected to complement the primary residence. Once these components are installed, the structure is protected from the elements and ready for interior work.
8. Mechanical System Installation
Mechanical work includes plumbing, electrical, and HVAC systems. Water supply lines, drain lines, and vent pipes are installed throughout the ADU. Electrical wiring, outlet boxes, lighting locations, and appliance connections are also completed.
Many ADU construction projects use ductless mini-split HVAC systems. During this phase, refrigerant lines, electrical connections, and drainage components are installed inside the walls.
Before moving forward, town inspectors review the plumbing, electrical, framing, and HVAC work to ensure everything meets local requirements.
9. Insulation and Interior Wall Finishes
Once inspections are approved, insulation is installed throughout the building. Spray foam and fiberglass insulation are the most common options used in ADU construction. Spray foam provides stronger air sealing, while fiberglass is often more budget friendly.
Following another inspection, drywall is installed on walls and ceilings. A plaster or finishing coat is then applied to create smooth interior surfaces ready for paint.
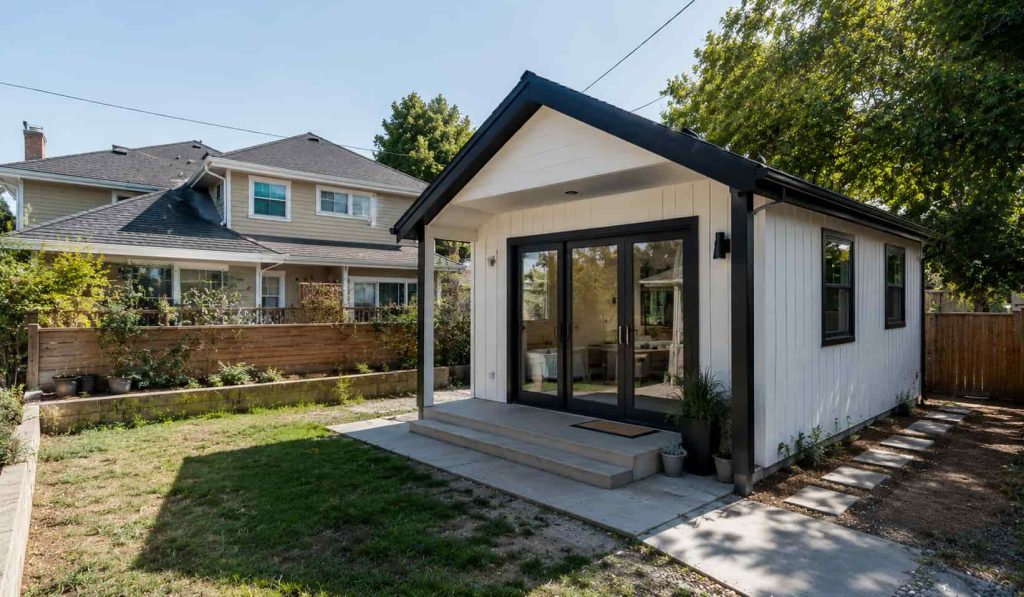
10. Interior Completion and Final Details
The final stage of ADU construction transforms the structure into a finished living space. Bathroom tile, cabinetry, countertops, interior doors, trim, and flooring are installed first.
Painting follows, along with lighting fixtures, plumbing fixtures, and household appliances. All design selections made earlier in the process come together during this phase.
After construction is complete, a final walkthrough is performed to address any remaining adjustments. The project then undergoes a final building inspection. Landscaping and exterior improvements may also be completed before the ADU is officially ready for occupancy.
How Weather Conditions Impact ADU Construction
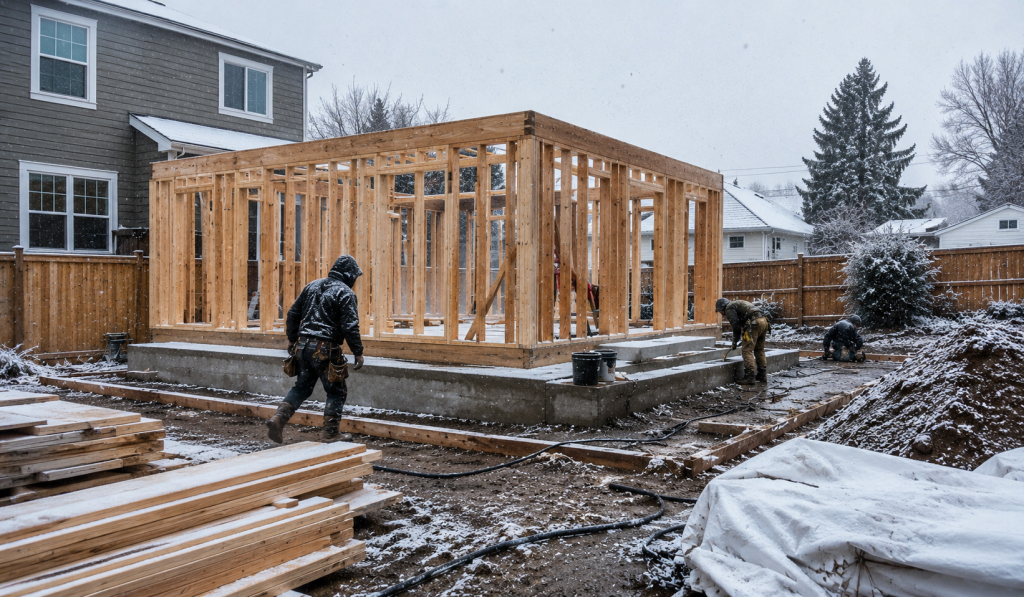
Massachusetts weather can play a major role in the success and timing of an ADU construction project. Harsh winters, freezing temperatures, snowfall, and frozen ground can make several stages of construction more difficult. Activities such as excavation, utility trenching, foundation installation, and concrete work are often the most affected. When the ground freezes, contractors may need specialized equipment to thaw the soil before work can continue, increasing both project costs and timelines. Some municipalities also place seasonal restrictions on street excavation work, which can delay utility connections until warmer months.
Concrete installation can be especially challenging during colder weather. Foundations must cure within certain temperature ranges to achieve proper strength and durability. To meet these requirements, contractors may need to use heated enclosures, insulated blankets, or concrete additives during the curing process.
Winter conditions can also affect material deliveries and site accessibility. Snow accumulation, icy surfaces, and frozen ground can limit movement around the property and slow construction activities. While framing, roofing, and some exterior work can continue during colder months, productivity often decreases as crews work in more demanding weather conditions.
These seasonal challenges highlight the importance of working with experienced ADU builders who understand local weather patterns and construction requirements. Skilled professionals can anticipate delays, adjust schedules, and implement solutions that keep ADU construction moving forward as efficiently as possible.
Experienced ADU contractors are also better prepared to handle challenges beyond weather conditions. Utility connections, limited lot sizes, zoning compliance, and permit coordination all require specialized knowledge that differs from many traditional residential projects.
Unlike basic remodeling work such as renovating a kitchen or replacing a deck, ADU construction involves site planning, utility design, permitting, engineering, and compliance with local regulations. These additional requirements make proper planning and professional guidance essential from the beginning.
A knowledgeable ADU construction team can help manage every stage of the project, from initial design and approvals to final inspections, ensuring a smoother building experience and a higher-quality finished product.
Understanding ADU Construction Costs
The overall cost of ADU construction is influenced by several factors, with size and utility installation often having the greatest impact. However, local regulations, property conditions, permitting requirements, and design choices can also significantly affect the final budget. Understanding these expenses early helps homeowners make informed decisions and avoid unexpected costs during construction.
Essential Expenses for Every ADU Project
Construction Plans and Engineering
Every ADU construction project requires professional documents before permits can be issued. These often include architectural plans, site surveys, structural engineering drawings, utility layouts, and energy-efficiency reports. Massachusetts building departments generally require these documents to be prepared and approved by licensed professionals. Since each report carries its own cost, planning expenses can add up quickly before construction begins.
Permits and Approval Costs
Obtaining permits is another important part of ADU construction. Permit applications require detailed documentation, contractor information, and compliance with local building regulations. During the review process, towns may request additional reports related to drainage, fire safety, soil conditions, or other site-specific concerns.
Permit fees themselves can also represent a noticeable expense. Many homeowners focus on construction costs while overlooking permit charges and administrative requirements that are necessary before work can begin.
Site Preparation and Ground Work
Site preparation is one of the first major investments in ADU construction. This phase includes grading, excavation, trenching, foundation preparation, and utility installation. Although much of this work is hidden once construction is complete, it forms the foundation of the entire project and plays a major role in the overall budget.
Building the Living Space
The largest portion of most ADU construction budgets is the actual building process. This includes framing, roofing, insulation, windows, siding, electrical systems, plumbing, HVAC installation, drywall, flooring, cabinets, fixtures, and all interior finishes needed to create a functional living space.
Additional Costs That May Increase Your Budget
Challenging Site Conditions
Certain properties require more extensive preparation before ADU construction can begin. Sloped lots, poor soil conditions, retaining walls, drainage improvements, and difficult site access can all increase project costs.
Utility Upgrades
Utility-related expenses can vary greatly from one property to another. Older septic systems may require upgrades or full replacement before supporting an ADU. Electrical service upgrades, additional utility meters, sewer modifications, and specialized pumping systems may also be necessary depending on the property’s layout and infrastructure.
Future energy requirements can also influence costs. Some municipalities are adopting stricter energy-efficiency standards that may require additional electrical capacity, enhanced insulation, or solar-ready systems.
Construction and Code Requirements
Location-specific building requirements can also affect ADU construction costs. Certain projects may require fire-rated assemblies, sprinkler systems, enhanced energy-efficiency features, or additional safety measures depending on local regulations and the ADU’s location on the property.
Material selections also play a major role. Premium finishes, custom cabinetry, luxury flooring, upgraded appliances, and specialty design features can increase the overall project budget significantly.
Practical Ways to Reduce ADU Construction Costs
Careful planning can help homeowners control ADU construction expenses without sacrificing quality. Choosing a smaller design, simplifying the floor plan, and minimizing complex structural features can reduce both labor and material costs. Positioning the ADU close to existing utility lines can lower excavation and connection expenses. Selecting standard finishes instead of highly customized options can also help keep the project within budget.
Working with an experienced design-build team is one of the most effective ways to save money. Professionals familiar with local zoning, permitting, and ADU construction requirements can help avoid costly mistakes, reduce delays, and keep the project moving efficiently from planning through completion.
Need Help with Your Next Project? Call Royal Empire Builder Today!
Fast responses. Expert advice. Trusted service across NYC and beyond.